Ok, so 2 days ago, a friend of mine had her iPhone 4 stolen. She was in a Starbucks, got up from her table to leave, threw out her empty coffee cup, walked outside about 20 feet, and quickly realized that she forgot her iPhone. She looked in through the window at the table where she was just sitting and saw that her iPhone was already gone! Crazy.
I helped her look for it EVERYWHERE! In the trash, under all of the tables, in the corner, in the guy’s bag who had sat down at the same table where she was sitting…nada!
So we went through the options:
- Did she subscribe to MobileMe? –> Nope!
- Had she backed up her iPhone via iTunes? –> ‘Fraid not! Never did. Not even once.
- Did she have insurance on her iPhone? –> Ummm…nope!
Unfortunately, she had not prepared for such a situation because she lives and hangs out in a really nice area of town. But, alas…this is LA! However, in her defense, one of the workers at that Starbucks who has worked there for a while said something gets stolen from a customer there maybe once or twice a year. So it just so happened that she was one of those two! Not cool.
But because that unfortunate incident happened, you guys benefit, because I’m going to hook you up with some info that will help you protect your iPhone (and your other iOS devices), or at the very least, protect your data, in case this happens, which hopefully it won’t!
Back it up!
First off, you MUST MUST MUST backup your phone. It’s super easy. All you have to do is hook up your iPhone to your computer via USB. Use the same cord you use to charge it, but take off the adapter that allows it to plug into the wall so you can plug that end into the USB port of your computer.
Then, select the music, movies, etc. that you want on your iPhone by clicking on the corresponding tabs at the top of iTunes, and putting check marks in the boxes next to the items that you want to put on your iPhone. Then click APPLY in the bottom right corner of iTunes. Let it do its thing (sync/copy the files), and then you’re done! Every time it syncs, it will backup your iPhone’s data, unless you tell it not to in the Preferences of iTunes.
Here, watch this for a visual:
[youtube]http://www.youtube.com/watch?v=5KHMLLpEYSs[/youtube]
OK. Cool. So now you have all of the data on your iPhone backed up, including SMS, photos, call history, music, email…everything. Nice. That way, if you don’t happen to get your iPhone back because the guy that took it is just too large for you to handle, then you can at least get another iPhone, sync it to your computer, put all of your data that was on your old iPhone onto the new one, and get your life back. However, you can always go to the cops and have them take on the large one who took your phone.
How to Use “Find My iPhone”
After you back up your iPhone, you want to register for the “Find My iPhone” service.
But first, before we do that, watch this video so you have a visual of how “Find My iPhone” works:
[youtube]http://www.youtube.com/watch?v=HlbJ4xePvL0[/youtube]
Isn’t that a cool service? And the best part? If you have an iPhone 4, an iPad, or a 4th generation iPod Touch, it’s FREE! Apple is so cool to us customers.
So, let’s get your iPhone registered right now.
First, you’ll need to download and install the “Find My iPhone” app, if you haven’t already.
To do this, just click on the App Store app on your iPhone, click on the “Search” tab at the bottom of the screen, and then type in “Find My iPhone” (no quotes) in the search field at the top of the screen. The icon for it should pop up (it’s the same one as the green circle that’s in the main image for this blog post). Just click on it to go to the page for that app, and then click “Install”.
Once you have “Find My iPhone” installed on your iPhone, follow the steps below.
Step 1:
Make sure your iPhone is running iOS 4.2. The way to check is go to SETTINGS>GENERAL>ABOUT>and look at the number next to VERSION. If you have that version or higher, great. Let’s keep going.
If you don’t, then update your iPhone OS simply by connecting your iPhone to your Mac or PC and follow the onscreen instructions in iTunes (open iTunes if it doesn’t open automatically when you connect your iPhone to your computer).
If you’re creating a free account for the first time, you’ll need an iPhone 4.
Step 2:
Go to SETTINGS>MAIL, CONTACTS, CALENDARS

Step 3:
Click on ADD ACCOUNT>MOBILEME

Step 4
Enter your Apple ID and Password.

If you already have an account with the iTunes store, or you’ve bought something from Apple’s online store, then you already have an Apple ID.
If you don’t have one, then click “Create Apple ID” at the bottom of the screen and follow the prompts.
If you’re a MobileMe subscriber already, then simply enter your .me or .mac email address and password.
Step 5
Verify your account.

If it says “Not Verified” under your MobileMe account, go to your email inbox and look for a message from Apple that was just sent to you. Open the email, click the Verify Now link, and sign in with your new Apple ID that you just created.
If you don’t see an email from Apple in your inbox, then click on your MobileMe account, and click “Resend Verification Email.”
Step 6
Go back to the MobileMe screen and turn on “Find My iPhone.” When the “Find My iPhone” message pops up, click ALLOW.

Step 7
Give it a shot! Open up the “Find My iPhone” app that you download and log in. You should be able to see your phone listed, and also be able to locate it. You can also use it to locate other phones that are registered with this service. All you have to do is log in with their Apple ID with the app.
You can also log into www.me.com with your Apple ID, instead of using the app, and do the same thing.

UPDATE: Here’s How to Get it to Work on an iPhone 3G or 3GS
A reader wrote in and asked it this worked on an iPhone 3G or 3GS. So I did some research, and according this post on Lifehacker.com, it does!
You just need to use a qualifying iOS device, meaning a 2010 or later iOS device, to set it up. Use a friend’s if you don’t happen to have one, because you can delete their device from your account after you set up your device on the service.
Simply follow the steps above with either your or a friend’s 2010 iOS device using YOUR Apple ID. Once the newer iOS device is registered with your Apple ID, follow the same steps above with your iPhone 3G or 3GS, also using your Apple ID.
Test the locating of your device with the service by using the app on the newer iOS device (or on any other iOS device with the free Find My iPhone app, which they can download from the app store if they don’t have it), or by logging into www.me.com.
After you confirm that the 3G or 3GS works, if the newer iOS device is not yours or you don’t want it attached to your Apple ID, on the newer iOS device, delete your MobileMe account (SETTINGS > MAIL, CONTACTS, CALENDARS > MobileMe account > Delete Account). If you do want to keep it attached, just leave it alone.
After that, you should be good to go!
Update: I just tested it and this does work.
Things You Need to Know
- Your iOS device needs to be ON in order for you to be able to locate it, so KEEP YOUR BATTERY CHARGED (that was another factor against my friend in the story above…the phone had only 7% on it, so when we tried to call it, it went to straight to voicemail, which means it was off)
- If you’re trying to locate an iPod Touch or iPad, since the service cannot use cell triangulation, your iOS device will need to be connected to a wifi network in order for it to be found, because the service locates the device by locating the router that is broadcasting the wireless signal that your iOS device is currently on
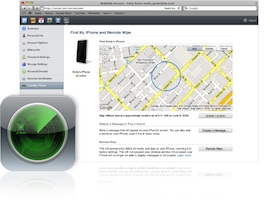
- You can prompt your iOS device to pop up a message that tells people your device is lost, and you would appreciate it if they returned it. Your message will pop up with a loud sound that will sound, even if the sound is turned off. And no one will be able to turn the sound off.
- If you don’t think you’re going to be able to retrieve it, you can remotely wipe your iPhone of all of your data just by logging into www.me.com and selecting that service. Apple’s got your back!
TROUBLESHOOTING: This service will not work for you if…
- iPhone is not on or currently not connected to a data network (Edge, 3G or Wi-Fi)
- iPad or iPod Touch is currently off or not connected to a Wi-Fi network
- “Push” is not enabled in (SETTINGS > MAIL, CONTACTS, CALENDARS > FETCH DATA)
- You tried to initiate a remote wipe of the phone (wiping all of the data remotely; you would only do this if you lost it or if it were stolen, and you did not think you would ever get it back)
- You have multiple MobileMe accounts on the iPhone
- The date isn’t right on your iPhone
- The device’s iOS version is not up to date (or at least iOS 4.2; SETTINGS>GENERAL>ABOUT>VERSION)
- Your MobileMe account is not configured correctly in your iOS device (try deleting it and adding it again; see steps on how to do this above)
- The “Find My iPhone” service is not on (SETTINGS > MAIL, CONTACTS, CALENDARS > Your MobileMe Account > Make sure “Find My iPhone” is ON)
- Your iPhone is in and out of service (doesn’t have a strong signal)
- Location Services is not enabled (SETTINGS > GENERAL)
- You’re living in a country where Apple does not offer this service
- If it says, “Location not available,” (it might even say “Message pending” underneath “Location not available”) and you’ve gone through and tried all of the above troubleshooting items, then try deleting the MobileMe account (SETTINGS > MAIL, CONTACTS, CALENDARS > MobileMe account > Delete Account), and then add it back in, BUT…TURN OFF “Find My iPhone” BEFORE you save it. AFTER you save the new account, THEN go back in and TURN ON “Find My iPhone.” That’s what finally fixed it for me.
TROUBLESHOOTING
For more trouble shooting tips, go here:
http://support.apple.com/kb/TS2734?viewlocale=en_US
Now you have it set up and…surprise, surprise…it works!
So now you’re in a MUCH better place than my unfortunate friend was when her iPhone got stolen. You’re educated on how to backup your iOS device so you’ll always have your data, and on how to use “Find My iPhone” to locate it if you’re ever in the unfortunate circumstance where you can’t find your iOS device.
Be sure and share this post with your friends on Twitter, Facebook, via email, and wherever else you hang out online so they can benefit as well.
And if you have any comments or any stories to share, the comment section is below!
BONUS: An Informative Review of “Find My iPhone”
Just thought you guys might enjoy this informative review of the “Find My iPhone” app that has real life examples of its use:
[youtube]http://www.youtube.com/watch?v=2vkTCeZN5Ts[/youtube]
Match.com: #1 Dating Site – View Pics for Free
Los Angeles Computer Repair | Los Angeles Computer Tech | Computer Repair Services

 A client friend of mine just sent me an email telling me about a killer free offer that a very well known and widely used online storage service is offering.