
Is your Mac slow? Here are the 6 top ways to speed up your Mac!
Recently my Mac was performing slower than normal, which was really bothersome to me, because I just recently upgraded my hard drive to a solid state drive (SSD).
In case you aren’t familiar, a SSD drive is the same technology as a USB flash drive (also called a jump drive or thumb drive).
Just like a USB flash drive, there are no moving parts in a solid state drive, unlike a conventional hard drive, which is one of the reasons why a SSD drive is so much faster!
You get super fast access to your data!
It’s the #1 way to speed up your computer, BY FAR. You’ll see a HUGE difference in the speed of your Mac (or PC) if you replace your conventional hard drive with a SSD drive.
Want a visual to see how much faster it is?
Watch this…
[youtube]http://youtu.be/j84eEjP-RL4[/youtube]
Pretty amazing, right?
So I was pretty perplexed why my computer was responding slowly (this happened a few months after I installed the SSD drive; it was super fast when I first installed it!).
At first I was wondering if it were a hardware issue.
But then, coincidentally, I moved everything that was on my Mac’s desktop into my documents folder, because it was just getting too crowded (too many screenshots), and it was affecting my focus.
It looked like this…
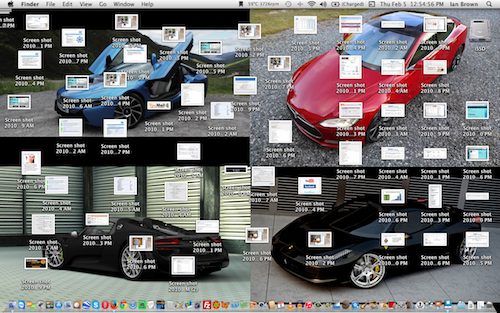
But when I cleared it to look like this…
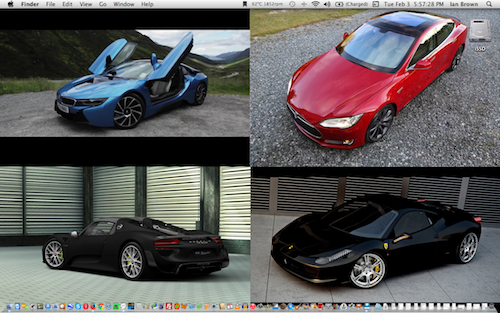
…my Mac sped up instantly!
I’ve always known that having lots of files on your Mac’s desktop can slow it down, but I thought that was only caused by very large files or folders and mainly affected conventional hard drives. Apparently not!
So, if your Mac used to be quicker, but has slowed down, I strongly urge you to move all of the files and/or folders that are on your Mac’s desktop to your Documents folder (or to your Pictures, Music, Movies, or Downloads folder, depending on what the files are).
After you move all of your files and folders off of your Mac’s desktop, all you should see is your hard drive (see the 2nd screenshot of my desktop above), which is most likely named, “Macintosh HD,” if you haven’t changed the name of your hard drive.
Now I could just stop there and say, “That’s how to speed up your Mac!
But I’m not going to do that, because that’s not how I roll.
I’m going to give you 4 more tips, and I’ll be quick about it.
But just to make sure we’re all on the same page with the first two tips, here they are.
TIP #1: Replace your conventional hard drive with a SSD drive
If you are somewhat tech savvy and you would like to do this on your own, you can. It’s a pretty simple and quick procedure.
Just search YouTube for “how to replace hard drive”, along with the make and model of your computer, and you’ll find a video that will show you exactly how to do it.
For example, if you have a Macbook Pro from 2009, search for “How to replace hard drive Macbook Pro 2009.”
Or you can have a tech savvy friend or professional do it for you.
NOTE: For those of you who have a Macbook Air or a Macbook Pro with Retina Display, you already have a SSD drive. So no need to upgrade your hard drive if you have one of those, because you’re already good to go!
TIP #2: Move ALL files and folders OFF of your Mac’s desktop into your Documents folder (or to your Pictures, Music, Movies, or Downloads folder, depending on what the files are)
You should only see your hard drive on your desktop, which will most likely be called, “Macintosh HD”, if you didn’t change the name of it (see second screenshot above for a visual).
This is the quickest tip to implement out of all of them. This should only take you 30 to 60 seconds to do, or a little longer if you have to go through your files and folders and organize them.
Now for the third tip.
TIP #3: Add more RAM to your Mac
RAM is the memory that your programs use to run. So the more RAM your computer has, the more programs you’ll be able to run at the same time and the quicker they will perform.
Every computer has a limit as to the maximum amount of RAM it can have.
So if you want to take full advantage of the potential speed that your computer has to offer, then upgrading your RAM to the maximum amount it will take is a very wise thing to do.
How do you find out the maximum amount of RAM your computer will take?
Just head on over to www.crucial.com, select the make and model of your computer in the drop down menus, and then click FIND UPGRADE. On that page it will tell you the maximum amount of RAM your computer can handle.
Upgrading the RAM on your computer is also a very easy procedure that only takes 30 seconds to a few minutes to do, depending on your computer.
Search YouTube for a video on how to do it for your specific model.
But again, if you don’t feel comfortable doing it yourself, have a tech savvy friend or professional do it for you.
NOTE: The RAM on Macbook Airs and Macbook Pros with Retina Display that were made in 2012 or later is not upgradable.
TIP #4: Repair Disk Permissions
Another possible way to speed up your Mac is to repair your disk permissions. You want to do this every time you install a new software program, update a software program that’s already installed, or update your operating system.
This will not always speed up your Mac. Only if it has to repair a lot of permissions will you see a difference.
But I do recommend getting into the habit of doing this every time you install or update a software program, or update your OS.
Here’s how to do it:
- Click on FINDER in the dock (the “dock” is the bar across the bottom of your screen where you can launch applications). FINDER is the first app on the left side of your dock with the icon of a two-tone face. You should see the word, “FINDER” in the menu bar in the top left corner of your screen after you click on it.
- In the menu bar at the top of your screen, click on GO>UTILITIES.
- Double-click on DISK UTILITY
- In the window that pops up, click on “Macintosh HD” (or whatever you’ve named your hard drive). It will be the first drive listed on the left side of the window.
- Then, on the right side of the window, click on the button that says, “REPAIR DISK PERMISSIONS”.
- You can go about your work after you do this if you want, as it will take from just a few minutes to an hour or longer. You can just minimize the window if you want to work while it’s doing its thing.
- Once it is done, on the right side of the window, in the big white box, it will say PERMISSIONS REPAIR COMPLETE.
- Close the window and you’re done!
TIP #5: Free up space on your hard drive so 25% of it is free
Another way your Mac can be slowed down is if your hard drive is low on available storage space.
Your Mac needs space to breathe when it comes to the amount of space the is available on your hard drive. You should have a minimum of 15% of your hard drive space free, more is even better.
So, for example, if you have a 500GB hard drive, you’ll want to have at least 75GB available (500 X .15).
Want to know how to check how much space you have available?
Simply RIGHT-click on your hard drive on your desktop (it’s usually called, “Macintosh HD”), and select GET INFO. You’ll see CAPACITY and AVAILABLE.
The number next to AVAILABLE is the amount of free space you have on your hard drive. That number should be at least 15% of the number next to CAPACITY.
If you find you need to free up some space, the quickest way is to use a free program called Grand Perspective to find the largest files on your computer, and then either delete the ones you no longer need, or move some to an external hard drive.
But ONLY delete something if you know what it is. If you’re not sure what it is, do not delete it.
Here’s how to use Grand Perspective:
[youtube]https://www.youtube.com/watch?v=Prx2z3qw6W4[/youtube]TIP #6: Perform a fresh install of your operating system
This, of course, is a last resort, because it’s quite the process. But it is an option. Basically it entails backing up your data, and then wiping your hard drive clean and installing a fresh copy of Mac OS X.
If you don’t already have a Time Machine backup, then you’ll want to back up your data manually before you do this.
If you don’t have a Time Machine backup, the easiest way to back up your data manually on a Mac is to back up your HOME folder, which contains all of your data and applications.
Your HOME folder is located in your USERS folder.
To access your HOME folder, just double-click on “Macintosh HD” on your desktop (assuming you didn’t change the name of your hard drive), then double-click the USERS folder.
In your USERS folder you should see a folder with your name on it (or a folder named whatever name you entered for ACCOUNT NAME when you set up your Mac), and the icon for it will be a picture of a house, NOT a picture of a folder like you would expect. That’s the folder you’ll want to copy to an external hard drive to back it up.
Once you back up your HOME folder, the next step is to create a bootable USB Thumb drive of the latest version of Mac OS X, which currently is 10.10 Yosemite.
Just make sure you have one of these Macs before you install Mac OS X 10.10 Yosemite:
- iMac (Mid-2007 or newer)
- MacBook (Late 2008 Aluminum, or Early 2009 or newer)
- MacBook Pro (Mid/Late 2007 or newer)
- MacBook Air (Late 2008 or newer)
- Mac mini (Early 2009 or newer)
- Mac Pro (Early 2008 or newer)
- Xserve (Early 2009)
If you have an older Mac than those listed above, you’ll need to install a previous version of Mac OS X that’s compatible with your Mac, or just reinstall the version of Mac OS X that your Mac is currently running.
If you’re not sure what’s the latest version of Mac OS X that you can install on your Mac, then either Google it or give Apple a call at 1.800.APL.CARE.
If you do end up having to install a previous version of Mac OS X, either use the Install Disk that came with your computer (if that’s the version of Mac OS X your Mac is running), or watch one of these videos listed below to learn how to create a bootable USB drive for your respective version of Mac OS X:
- How to create a bootable USB flash drive for Mac OS X Mavericks 10.9
- How to create a bootable USB flash drive for Mac OS X Mountain Lion 10.8
- How to create a bootable USB flash drive for Mac OS X Lion 10.7
Now, assuming you have one of the Macs listed above and you can install Mac OS X 10.10 Yosemite, let’s first create the bootable USB flash drive with Mac OS X Yosemite on it.
Here’s how to do that:
[youtube]https://www.youtube.com/watch?v=bQurLY61EtA[/youtube]After you’ve created a bootable USB Thumb drive of the version of Mac OS X that’s compatible with your Mac, the next step is to install Mac OS X onto your Mac.
Here’s how to perform a fresh install of Mac OS X with the bootable USB flash drive that you just created:
(the video below shows you how to install Yosemite with a bootable USB flash drive, but it’s the same process for the other versions of Mac OS X that I listed above as well)
[youtube]https://www.youtube.com/watch?v=7HflJCIRZ-g[/youtube]Once that is done, then all you have to do is copy your data from your HOME folder back onto your newly restored Mac!
Just go into each folder in your backed up HOME folder (Desktop, Documents, Downloads, Movies, Music, Pictures, and Public), and copy the files in each folder into the folder named the same name in your new HOME folder on your newly restored Mac.
You can also use the Migration Assistant and point to your HOME folder to have your Mac copy your data and programs from your backed up HOME folder onto your newly restored Mac.
But since your Mac was having issues, then it is best to restore your data manually by copying the data into each folder separately, as I described above, so you don’t carry over any of the problems that you were previously having onto your newly restored Mac.
Well, that wraps it up!
Those are the top 6 ways to speed up your Mac.
Now I want to hear from you. What are some ways that you have sped up your Mac? Please put them in the comments below so everyone can benefit!
Thanks and enjoy your newly sped up Mac!


Leave a Comment